Inside this article you will find:
- Creating Books, Chapters & Concepts
- Edit Concept Menu
- Uploading Video & Images
- Adding Play Animations
- Portrait Mode
- Play Scrubber
- Shapes Menu
WHY THE ASSIST MOBILE APP IS SO VALUABLE
The ASSIST mobile app gives you the power to bring your entire basketball library with you wherever you go. It also gives you the power to CREATE your basketball library wherever you go, DISCUSS it with other team members and SHARE select content with others.
With new communications and content creation features being added, the ASSIST mobile app is quickly becoming the one stop shop for managing all your basketball learning materials for teams, brands or individuals building their personal portfolios.
Creating Books, Chapters & Concepts
These are the foundation of your knowledge library. Learn more about organizing your library HERE. You can create each of these three by hitting the "+" button, located in the upper-right of your screen, (hidden in the drop-down menu if using on your phone).
For the purposes of this tutorial we will focus on how to create Books, Chapters & Concepts based on the layer structure of the app, (again, read about organizing your library when you have the chance.)
BOOKS
Books can only be created from the home screen. Hit the hamburger menu (three dots) to open up the drop down options, then:
- Hit the "+" button
- Choose "Book"
- Create Book Name & Choose Book Type
NOTE: There are three types of Books:
- Concepts: These are used for storing most of your knowledge library content
- Games: These are used for generating brain games from knowledge library content
- Reports: These are used for associating reports built in the Game Plan editor
We will focus on the first Book Type - Concepts - in this tutorial
.png?width=688&name=Creating%20Books_Assist%20(1).png)
CHAPTERS
Chapters can only be created when you are inside of a Book. Hit the hamburger menu (three dots) to open up the drop down options, then:
- Hit the "+" button
- Choose "Chapter"
- Create Chapter Name & Choose Group
NOTE: You can alsocreate a new group by typing a name into the "Group Name" field.
.png?width=688&name=Creating%20Chapters_Assist%20(1).png)
CONCEPTS
Concepts can be created from anywhere, but it's most common to create Concepts inside the Chapter they are going to be placed in. Inside the Chapter you will simply select the "+" button in the upper right and enter the Concept name in the pop-up field as you did for Books and Chapters:

EDITING OR DELETING BOOKS, CHAPTERS OR CONCEPTS
To edit or delete Books or Chapters just do a quick "double-tap" with your finger on on the icon. To edit or delete a Concept, open the "Edit Concepts" menu as described in the section below.
Edit Concept Menu
The Concepts menu options may be the most powerful tool in the ASSIST app for managing your basketball content. There are actually two menus for each Concept.
- LEFT/RIGHT slide options (slide Concept name)
- Pop-Up "Edit Concept" menu (select yellow pencil from slide)
.gif?width=688&name=Concept%20Options%20menu%20(1).gif)
SLIDE OPTIONS
There are three options in the Assist Mobile app when you slide a Concept name Left/Right:
- EDIT CONCEPT: This option (yellow pencil) opens the "Edit Concepts" pop-up menu (L)
- DRAW PLAY: This option (Orange X & O) opens Assists Play Drawing editor (L)
- FAVORITES: This option adds a Concept to your personal "favorites" Chapter (R)
NOTE: A "Favorites" Book will appear on the home screen the first time anyone adds a favorite Concept. Inside the Book there will be Chapters labeled with the user name who created the "Favorite"
EDIT CONCEPTS POP-UP MENU
There are a ton of options on this menu. We'll cover the simple ones first:
ADD lets you make the Concept appear in another location in addition to its original location:
- Hit the "Add" button to bring up the "Add Concept to Chapter" menu
- Select the location you want to "add" it to by choosing the Book from the dropdown menu and the Chapter menu OR type in a new Chapter name to create a new Chapter.
- Verify the new location is correct. If it is, hit "Save". If not, hit "Remove".
NOTE: this is different from "Cloning". If you edit an "added" Concept, both versions will change.
.png?width=688&name=ADDING_CONCEPT%20(1).png)
HIDE a Concept from players and members that you only want visible to staff and admins:
- Locate the "Hidden for players and members" toggle
- Turn it to the "on" position (filled in yellow) and save
- Verify the Concept is hidden (visibility icon appears to far-right of Concept name)
NOTE: You may have to exit the Chapter first and re-enter for Icon to update/appear.
.png?width=688&name=HIDE%20CONCEPT%20(1).png)
CHILD Concepts are "nested" underneath the "Parent" Concept above them:
- Choose the Concept immediately under the "Parent" and open the Edit Concept Menu
- Switch "Child" toggle to "on" (in yellow) then hit "save"
- "Child" Concept title will appear slightly indented, like in an outline.
NOTE: Each Concept set to "child" will "nest" under the nearest "Parent". This means you can have multiple Concepts nested underneath a single parent.
PRO TIP: Putting "Parent" Concepts in all Caps and numbering your Child Concept titles is a great way to create a strong visual aide for your better comprehension.
.png?width=688&name=CHILD%20CONCEPTS%20(1).png)
CLONE CONCEPT:
Cloning a Concept creates a copy that you can edit without effecting the original.
- Create a Copy of a Concept
- Assign it to a new Book or Chapter (rename if appropriate)
.png?width=688&name=Clone%20Concept%20(1).png)
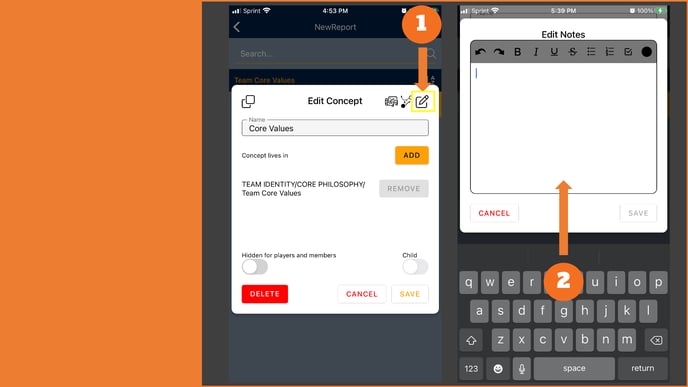
EDIT NOTES
A Simple way to add notes to any Concept. In fact if you add notes to a Concept that has no other asset in it, it will appear as the default asset when you view it instead of requiring you to hit the "notes" icon to view it:
Uploading Video & Images
You can upload video and images directly into a Concept in ASSIST by accessing either your photos, camera or your cloud based storage devices from your phone - iCloud, Google Drive, Dropbox, etc. This is one of the most powerful features in ASSIST.
.png?width=688&name=Uploading%20to%20Assist%20(1).png)
Add your cloud storage services for your "files" options if they don't already appear:
.gif?width=688&name=Cloud%20storage%20(1).gif)
ADDING PLAY ANIMATIONS
You have to different options for accessing the play drawing editor from a Concept. 1.) SLIDER icon can be found when you slide the Concept name left, (orange) or 2.) open the EDIT CONCEPTS menu (yellow pencil") and choose the black and white icon. 3.) Once open their are a few new features:
- Draw in Portrait mode on either phone or tablet
- A "Scrubber" that lets you control the play animation while you are editing
- A "Help" button (?) to explain a few basic functions for you
- A "Shapes & Text Overlay" options menu (read more about that HERE)
.gif?width=688&name=Drawing%20Plays%20(1).gif)