Video Walkthrough:
Inside you will find:
Teaching with Shapes and Text
Shapes and text overlays are a useful tool for calling out things that require extra attention from your learners. Whether you are recording playbook installs and drills for your players to review remotely or prepping for a live presentation, adding additional detail to help drive home your points helps make important information easier to remember.
How Shapes Work
The first trick to using shapes is finding them. When you are in drawing mode the "shapes" option menu is to the bottom-right of the player pucks. Once you select the "shapes" icon the pucks will be replaced by the shapes and text options:
.png?width=688&name=Shapes%20Options%20(1).png)
Placing shapes onto the court works the same as with the player pucks. You can either click the shape and then the spot on the court you want to place it or drag-and-drop straight from the menu.
There are seven shapes to choose from:
1. Circle | 2. Square/Rectangle | 3. Triangle | 4. Sight Cone | 5. X | 6. Line | 7. Cone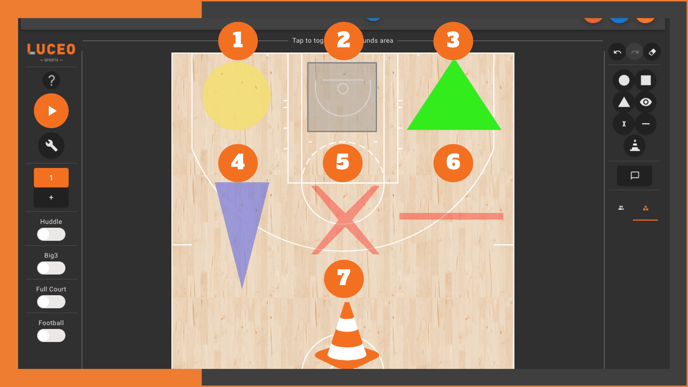
Shapes Adjustments
There are many ways to customize your shapes, (as shown in the video above). There are three basic ways to customize shapes by touching them once they are placed on the court:
- PRESS-AND-HOLD: Will allow you to drag the shape to different locations
- LONG PRESS: Will display "blue dots" to let you adjust size/dimensions
- QUICK CLICK: Will bring up the full shapes editing menu
.gif?width=688&name=Shapes%20Changes%20(1).gif)
Shapes Editing Menu
The editing menu provides complete control over how your shape is displayed. Along with being able to change shape location and dimensions from here, you also have the ability to:
- Add border to the shape
- Change color of the shape
- Change transparency level
.png?width=688&name=Shape%20editing%20(1).png)
How Text Overlays Work
You can drag-and-drop or click and place text overlays onto the court just like any other object in play drawing mode. You can also press-and-hold to move the shape to different locations on the court of quick-click to open the editing options menu.
The "APPEARANCE" option on the text editing options menu works exactly as it does on shapes; allowing you to edit color, transparency and add a boarder to your text box:
.png?width=688&name=text%20appearance%20(1).png)
The "TEXT & ANIMATION" options menu provides a whole new set of options for you to use:
1. Text field | 2. Font Size & Look | 3. Player Tokens | 4. Animation Timeline.png?width=688&name=Text%20animation%20(1).png)
The first and second options function just like you'd expect from any text editor. Write the words you want to appear, pick the size of the type and make bold, italicize, etc.
The two unique functions are tokens and animation. "ADD PLAYER TOKEN" allows you to add a call out number(s) anywhere in your text. This helps the learner match up the text with the specific player in question in your animated diagram.
.gif?width=688&name=Text%20Tokens%20(1).gif)
The "ADD ANIMATION" feature lets you choose when your text appears and disappears from view when your animated diagram is playing.
Lets take a look at how this works in three parts:
- Choose the number and hit "ADD PLAYER TOKEN" to add the token to the text field
- Hit the "ADD ANIMATION" button and then adjust where you want it to appear (position on timeline) and for how long (length of black segment):
.png?width=688&name=Looney%20to%20Steph%20(1).png)
Now choose another text overlay from the right-side menu and repeat the process:
.png?width=688&name=Steph%20to%20Klay%20(1).png)
The finished version now looks like this:
.gif?width=688&name=Finished%20Play%20(1).gif)